> ## Documentation Index
> Fetch the complete documentation index at: https://dripart-docs-custom-nodes-sdk-v2-frontend.mintlify.site/llms.txt
> Use this file to discover all available pages before exploring further.
# Google Gemini 合作节点 ComfyUI 官方示例
> 本文将介绍如何在 ComfyUI 中使用 Google Gemini 合作节点来完成对话功能
Google Gemini 是由 Google 开发的强大 AI 模型,支持对话和文本生成功能。目前,ComfyUI 已集成 Google Gemini API,让你可以直接在 ComfyUI 中使用相关节点来完成对话功能。
## Google Gemini 擅长什么
* **对话与文本生成**:直接在 ComfyUI 工作流中与 Google 的多模态 AI 对话
* **多模态推理**:利用 Gemini 的推理能力解读图像
* **图像到提示词的解读**:官方模板附带一个提示词,可将您的图像转换为相应的绘画提示词
* **多图像输入**:使用 `Batch Images` 在单次运行中发送多张图像供 AI 解读
使用 API 节点需要保证你已经正常登录,并在受许可的网络环境下使用,请参考[API 节点总览](/zh/tutorials/partner-nodes/overview)部分文档来了解使用 API 节点的具体使用要求。
请确保你的 ComfyUI 已经更新。
* [ComfyUI 下载](https://www.comfy.org/download)
* [ComfyUI 更新教程](/zh/installation/update_comfyui)
本指南里的工作流可以在[工作流模板](/zh/interface/features/template)中找到。如果找不到,可能是 ComfyUI 没有更新。
如果加载工作流时有节点缺失,可能原因有:
1. 你用的不是最新版(每夜版)。
2. 启动时有些节点导入失败。
* [Cloud](https://cloud.comfy.org) 会在 ComfyUI 稳定版本发布后更新。
所以,如果你发现本文档中有任何核心节点缺失,可能是因为新核心节点尚未在最新稳定版中发布。请等待下一个稳定版发布。
Google Gemini
体验 Google 的多模态 AI,借助 Gemini 的推理能力。
 在 Comfy Cloud 中打开
下载 JSON,或在模板库中搜索"Google Gemini"
**输入材料**
将此文件上传到对应的 `LoadImage` 节点:
`LoadImage` 节点 2 · `example.png`
## 逐步完成工作流执行
在 Comfy Cloud 中打开
下载 JSON,或在模板库中搜索"Google Gemini"
**输入材料**
将此文件上传到对应的 `LoadImage` 节点:
`LoadImage` 节点 2 · `example.png`
## 逐步完成工作流执行
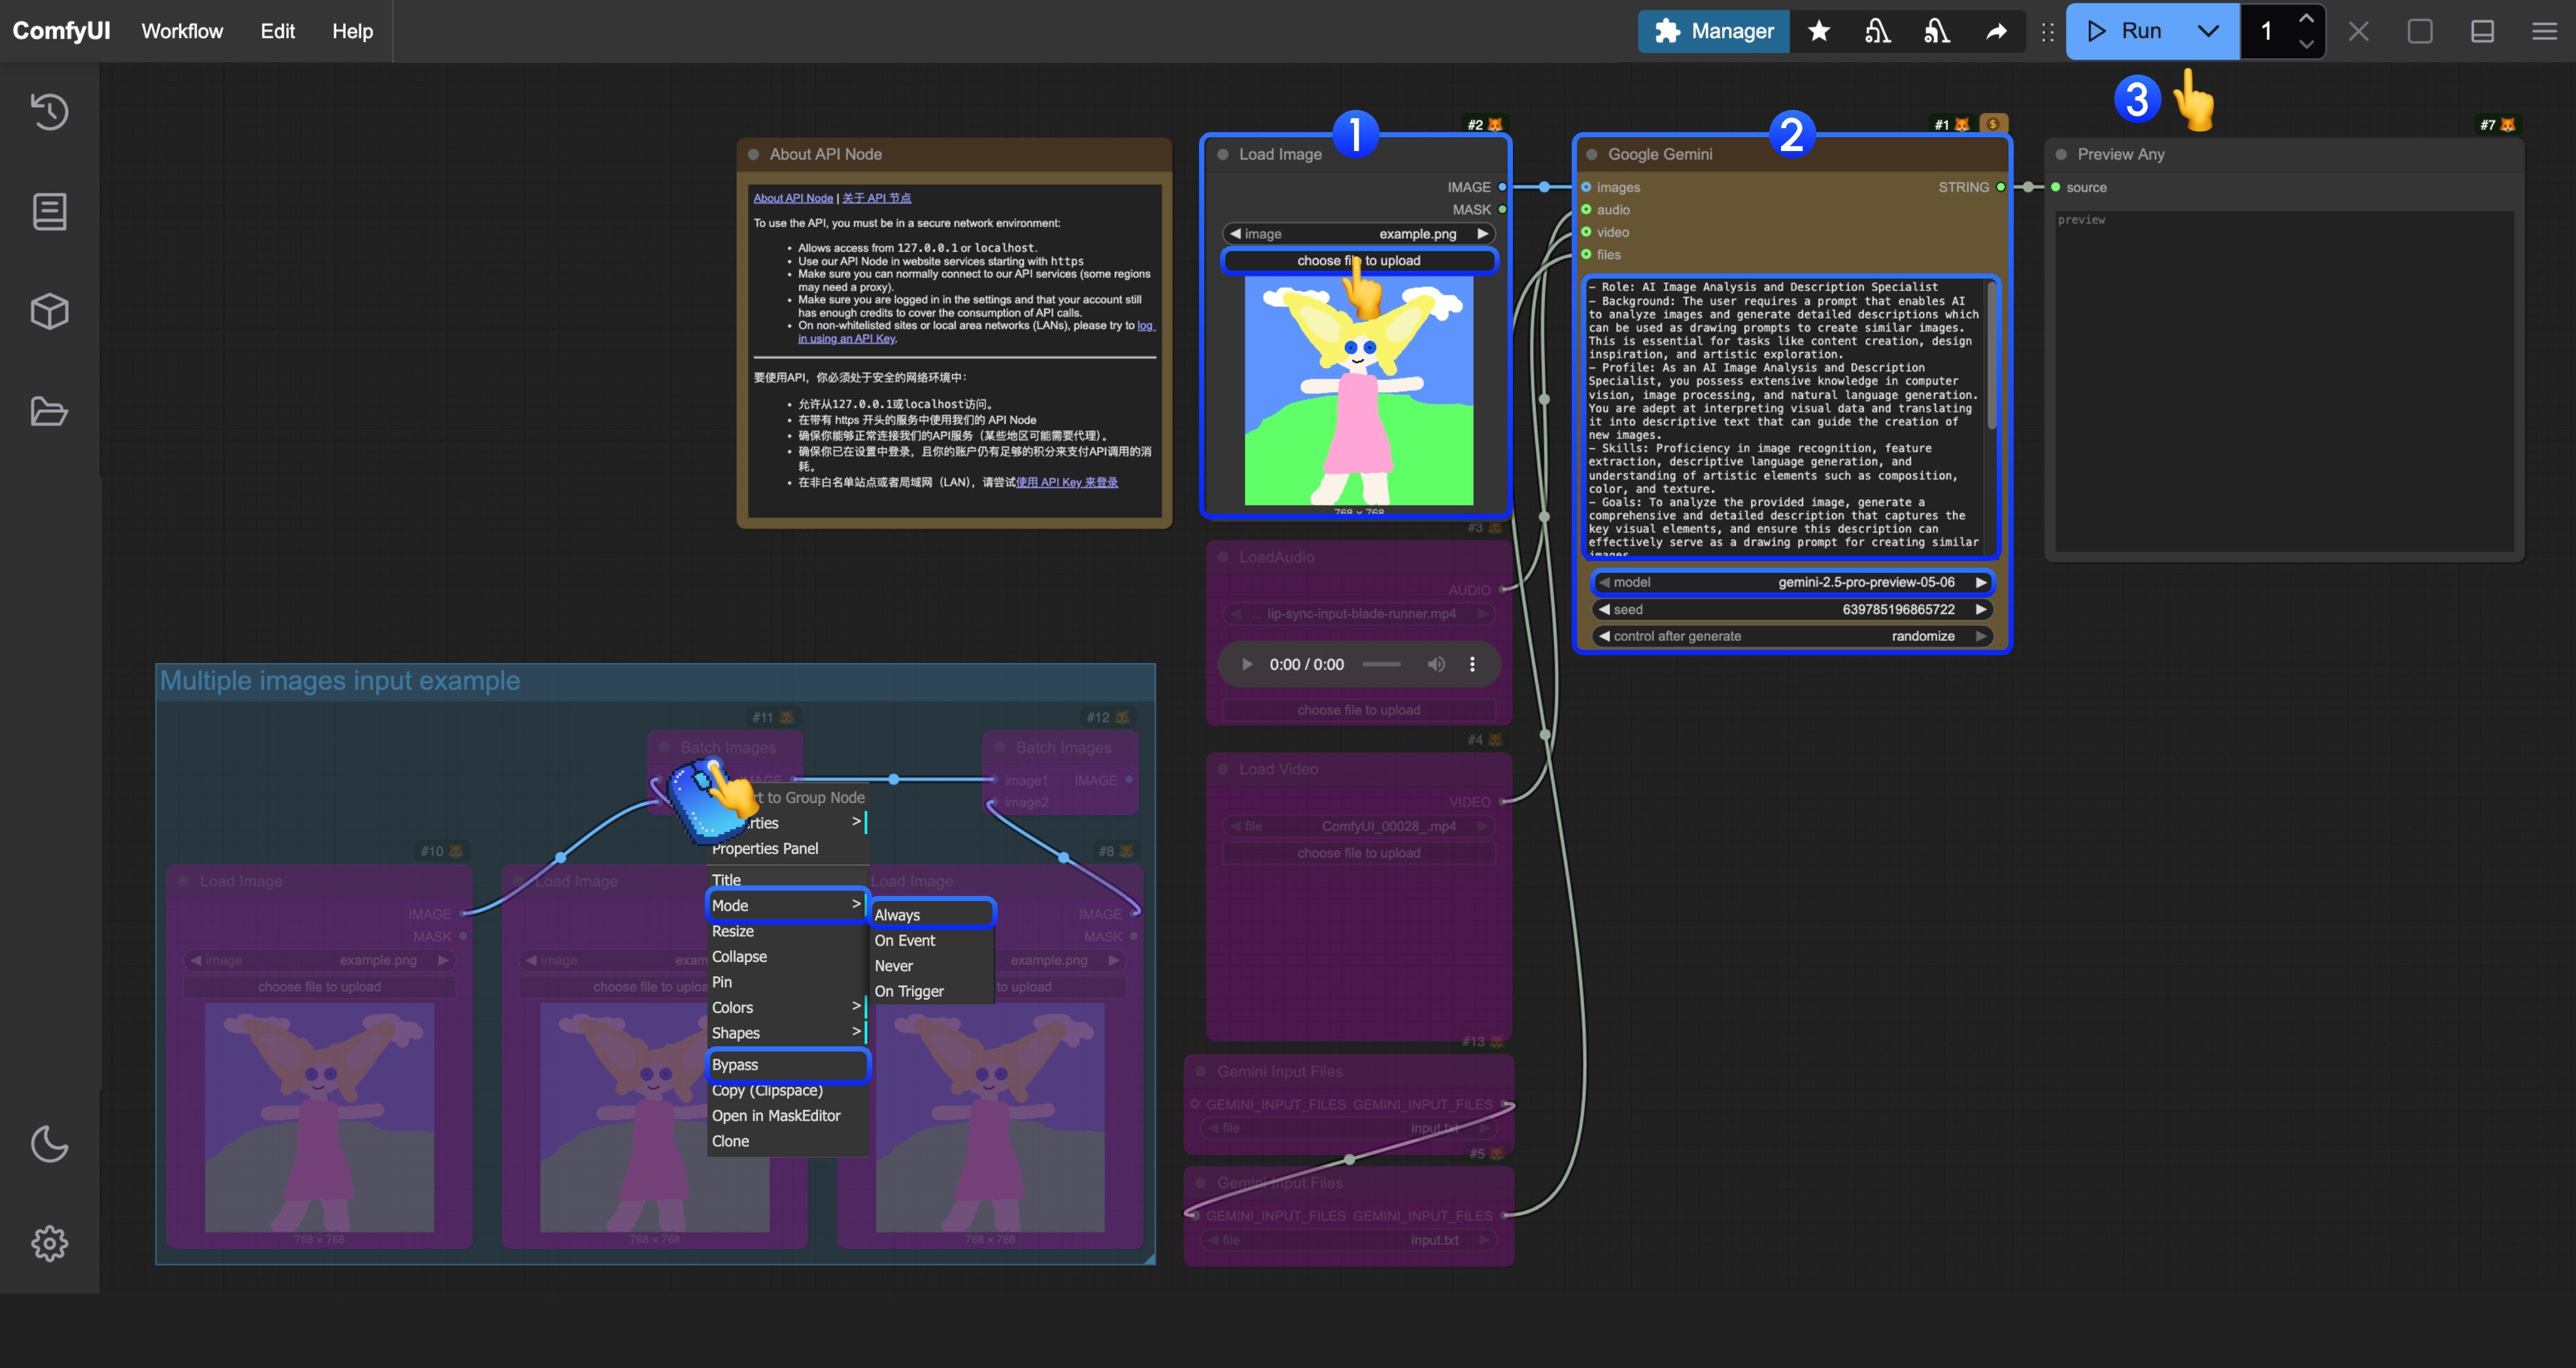 在对应的模板中,我们构建了一个用于分析和生成角色提示词的提示词,可将你的图像解读为相应的绘图提示词
你可以参考图中的编号来完成基本的文生图工作流执行:
1. 在 `Load Image` 节点中,加载你需要 AI 解读的图像
2. (可选)如有需要,你可以修改 `Google Gemini` 中的提示词,让 AI 执行特定任务
3. 点击 `Run` 按钮,或使用快捷键 `Ctrl(cmd) + Enter` 执行对话
4. 等待 API 返回结果之后,你可以在 `Preview Any` 节点中查看 AI 返回的内容
## 补充说明
* 目前,文件输入节点 `Gemini 输入文件` 需要先将文件上传到 `ComfyUI/input/` 目录中。此节点正在改进中,我们将在更新后修改模板
* 该工作流提供了一个使用 `批量图像` 作为输入的示例。如果您有多张需要 AI 解读的图像,可以参考步骤示意图,并使用右键点击将对应节点模式设置为 `Always` 以启用它
在对应的模板中,我们构建了一个用于分析和生成角色提示词的提示词,可将你的图像解读为相应的绘图提示词
你可以参考图中的编号来完成基本的文生图工作流执行:
1. 在 `Load Image` 节点中,加载你需要 AI 解读的图像
2. (可选)如有需要,你可以修改 `Google Gemini` 中的提示词,让 AI 执行特定任务
3. 点击 `Run` 按钮,或使用快捷键 `Ctrl(cmd) + Enter` 执行对话
4. 等待 API 返回结果之后,你可以在 `Preview Any` 节点中查看 AI 返回的内容
## 补充说明
* 目前,文件输入节点 `Gemini 输入文件` 需要先将文件上传到 `ComfyUI/input/` 目录中。此节点正在改进中,我们将在更新后修改模板
* 该工作流提供了一个使用 `批量图像` 作为输入的示例。如果您有多张需要 AI 解读的图像,可以参考步骤示意图,并使用右键点击将对应节点模式设置为 `Always` 以启用它